Table of Contents
Handing someone a gift card feels a bit... anticlimactic sometimes, doesn't it? Just a small plastic rectangle, maybe tucked into a generic sleeve. You picked out the perfect store or restaurant, knowing they'd love the choice, but the presentation lacks a certain something. It doesn't feel like a *gift*, not in the way a wrapped box does. That's where the magic of a diy gift card holder comes in. It transforms that little card into something thoughtful, something crafted just for them.
Why Bother Making a DIY Gift Card Holder?
Why Bother Making a DIY Gift Card Holder?
So, you've got the gift card ready, right? The easy part. But then you stare at that little plastic thing and maybe the generic sleeve it came in, and it just feels... impersonal. Like you just grabbed it off the rack and called it a day. And honestly, Why Bother Making a DIY Gift Card Holder? Because it instantly elevates that standard plastic rectangle into something that says, "Hey, I actually put a little thought into this." It's the difference between a handshake and a hug. It shows you took an extra five minutes, maybe ten, to make the presentation match the intention behind the gift. Nobody gets genuinely excited ripping open a plain white envelope containing a gift card, but crack open something you clearly put together yourself? That's a different story.
Quick & Easy DIY Gift Card Holder Ideas
Quick & Easy DIY Gift Card Holder Ideas
Folded Paper Pockets
Alright, so you're staring down the clock and need a diy gift card holder *now*. Forget complicated stuff. Grab a piece of sturdy paper – maybe some nice cardstock or even just a cool page from an old magazine. Fold it in half, then fold up the bottom edge about an inch or two to create a pocket. Glue or tape the sides of that bottom fold down, leaving the top open. Slide the gift card in. Done. Seriously, that's it. You can dress it up later with a sticker or a quick doodle, but the basic structure takes less than a minute. It’s the ultimate quick and easy diy gift card holder trick.
Envelope Upgrades
Got a standard envelope? Perfect. Let's make it feel less like a bill and more like a present. Instead of just shoving the card inside, try lining the envelope. Cut a piece of patterned paper slightly smaller than the inside dimensions and glue it in. Or, get a bit fancy by cutting a slit in the envelope flap or body itself, just big enough to slide the gift card through so it peeks out slightly when you open it. A little ribbon tied around the envelope works wonders too. These are simple tweaks, but they make a huge difference in presenting your diy gift card holder.
Here are a few materials you likely have lying around:
- Scrapbook paper or wrapping paper scraps
- Old greeting cards
- Ribbon or twine
- Stickers or washi tape
- Plain envelopes
- Scissors and glue stick/tape
Toilet Paper Roll Tubes
hear me out. A clean toilet paper roll tube. Cut it shorter if you like, maybe two-thirds the original length. Fold one end flat and crease it, then fold that crease over again and secure it with glue or tape – that's one closed end. Slide your gift card inside. Now fold the other end the same way. You've got a little tube pouch. You can cover this with paper, paint it, or just tie a ribbon around the middle like a tiny cracker. It’s surprisingly sturdy and definitely not what anyone expects for a diy gift card holder.
Crafting Your Own DIY Gift Card Holder: A Simple Method
Crafting Your Own DIY Gift Card Holder: A Simple Method
Gather Your Supplies
let's get down to business on crafting your own diy gift card holder using a simple, reliable method. Think of this as your go-to recipe for making something decent looking without pulling your hair out. First things first, you need your materials. Forget needing a craft store explosion. You probably have most of this stuff lying around. You’ll want some kind of paper or cardstock that's a bit sturdier than printer paper – maybe a leftover piece from a project, an old file folder, or even a cereal box you're willing to decapitate and cover.
You'll also need something to cut with, like scissors or a craft knife (be careful with that!). A ruler is your best friend here if you want straight lines, which, let's be honest, makes things look about 70% better instantly. And you'll need adhesive – glue stick, double-sided tape, whatever holds paper together without making a wrinkly mess.
Measure and Cut Your Base
Now that you've assembled your arsenal, let's make the base of your diy gift card holder. Grab that sturdy paper. A standard gift card is roughly 3.375 inches by 2.125 inches. You want your holder to be big enough to comfortably fit the card plus have a little room for overlap or closure. A good starting point is to cut a rectangle that's about 7 inches tall by 6 inches wide.
Don't stress about being absolutely millimeter-perfect, but try to keep your edges reasonably straight. This rectangle is the flat piece you'll fold into the holder. Think of it as the raw material before it gets its fancy shape. This size gives you enough material to create a pocket and a flap.
Tools you'll likely need:
- Sturdy paper or cardstock
- Ruler
- Pencil
- Scissors or craft knife
- Adhesive (glue stick, tape)
- Bone folder (optional, but helpful for crisp folds)
Fold and Secure the Pocket
With your rectangle cut, it’s time to give it form. Lay the rectangle flat, good side down if your paper has one. Along the bottom edge (one of the 6-inch sides), measure up about 2.5 to 3 inches and fold the paper up. This creates the pocket where the gift card will sit. Use your finger or a bone folder to make that crease nice and sharp – a crisp fold looks professional, even if you just did it on your kitchen counter.
Now, you need to close the sides of this pocket so the card doesn't fall out. Apply a thin line of glue or a strip of double-sided tape along the left and right edges of the folded-up section, only on the part that will stick to the back. Press the folded part down firmly, sealing the sides. The top edge of this fold remains open, forming the pocket. The remaining paper above the pocket will be your flap, ready to fold down and complete your basic diy gift card holder structure.
Elevating Your DIY Gift Card Holders
Elevating Your DIY Gift Card Holders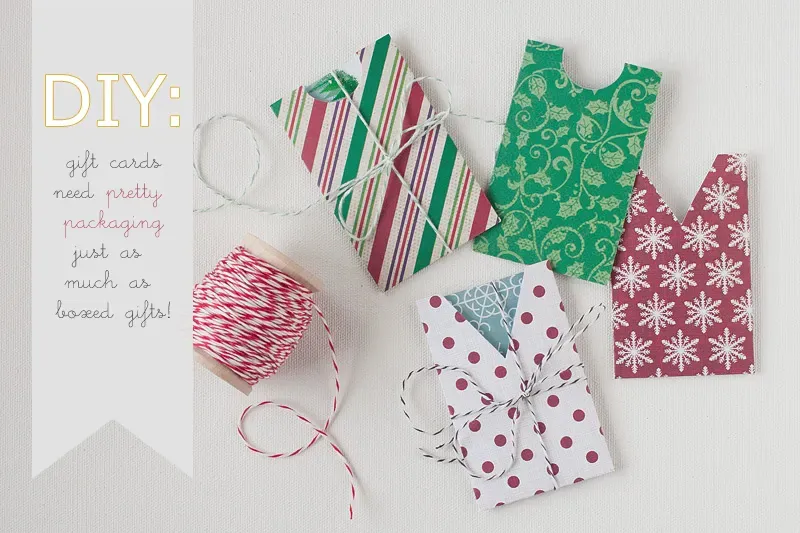
so you've mastered the basic diy gift card holder structure – you can fold paper or tubes with the best of them. But let's be real, a plain folded pocket is fine, but we can make it *better*. This is where you add the flair, the sparkle, the *you* to the holder. Think beyond just sticking a bow on it. Consider the person you're giving it to. Are they into cats? Find some cat stickers or draw a silly cat face. Do they love a specific color or pattern? Use paper that screams their style. Adding small details like a button, a piece of twine, a stamped image, or even just carefully written calligraphy can make a huge difference. It takes your simple diy gift card holder from functional to fabulous without a ton of extra work.
Wrap It Up: Your Finished DIY Gift Card Holder
So there you have it. Turning a plain gift card into a proper present doesn't require a degree in advanced paper folding or a lifetime supply of glitter. A simple diy gift card holder takes minimal effort but signals you put in a little extra thought beyond just grabbing a card off the rack. It’s a small detail, sure, but sometimes those small details are the ones people actually remember. Give it a shot; you might find it's less of a chore and more of a genuinely satisfying way to give a gift.