Table of Contents
Tired of those generic, store-bought bows that feel totally impersonal? Want to add that extra touch of 'wow' to your presents without breaking the bank? You're in the right place! Let's dive into the wonderful world of diy gift ribbon and discover how incredibly easy it is to craft stunning, homemade bows. Forget fumbling with flimsy store ribbons, we’re talking about creating personalized masterpieces that scream thoughtfulness and creativity. This guide will walk you through simple yet impactful techniques to master diy gift ribbon bows. We'll explore various styles, from classic loops to fancy rosettes, even venturing into paper and fabric options for unique textures and looks. Get ready to transform your gift-wrapping game and impress everyone with your newfound diy gift ribbon skills. By the end of this article, you'll be equipped with essential tips and step-by-step instructions to make perfect diy gift ribbons every single time, ensuring your gifts always stand out.
Simple Techniques for DIY Gift Ribbon Mastery
Simple Techniques for DIY Gift Ribbon Mastery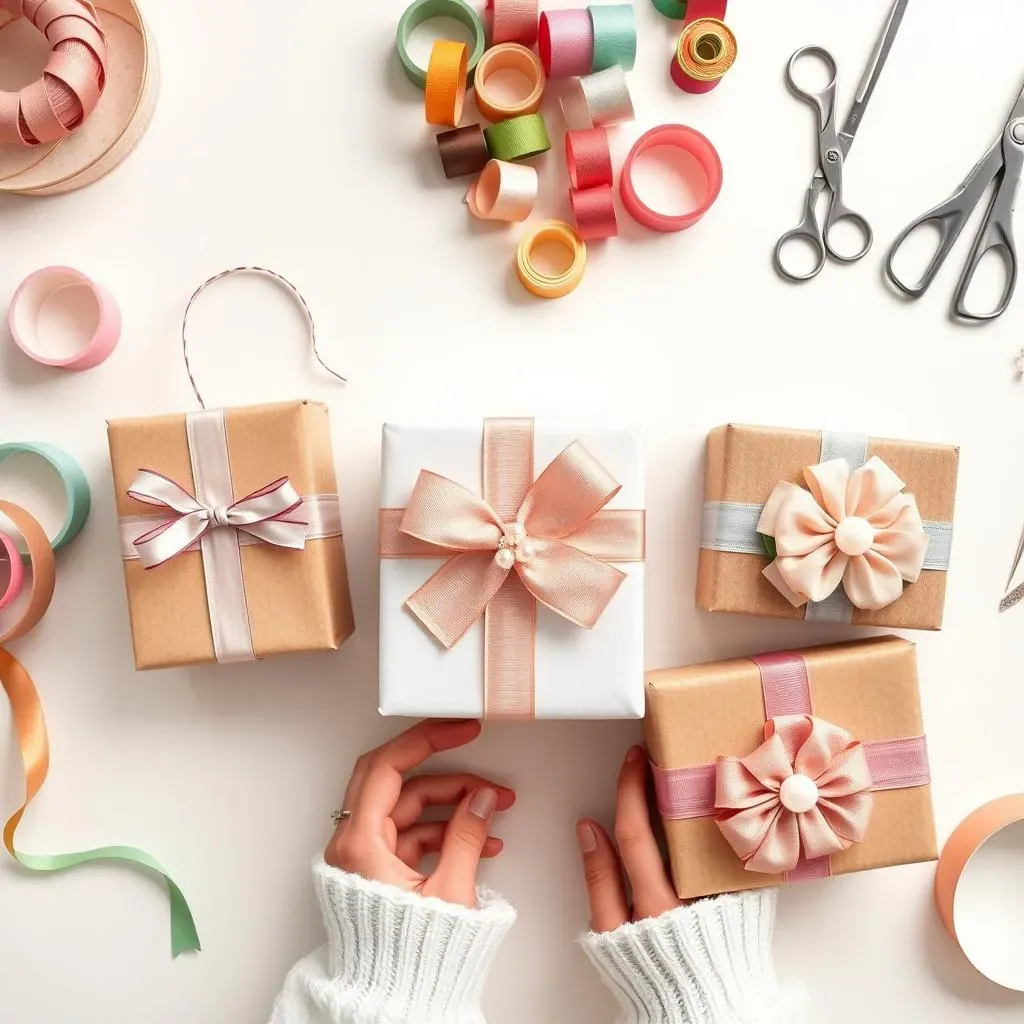
The Foundation: Mastering the Basic Loop Bow
Let’s kick things off with the absolute bedrock of diy gift ribbon mastery: the basic loop bow. Seriously, if you can nail this, you're already halfway to ribbon-tying royalty. Think of it as learning to ride a bike – once you get the hang of the loops and the knot, the rest is just variations on a theme. Grab your ribbon – wired ribbon is your best friend for beginners because it holds its shape like a champ – and let’s get started. You’ll be surprised how quickly you can whip these out, transforming plain packages into something special.
Start by making a loop, then another, and another, keeping them roughly the same size. Pinch them in the center, and then comes the magic – the knot! It’s all about creating a secure center that holds those loops together. Don't worry if your first few attempts look a bit wonky, practice makes perfect, and even slightly imperfect handmade bows have a charm that store-bought ones just can't match. Trust me, there’s a certain satisfaction in knowing you crafted that little burst of prettiness with your own two hands.
Elevating the Basics: The Layered Bow
Ready to take your diy gift ribbon skills up a notch without getting complicated? Enter the layered bow. This technique is all about adding depth and visual interest to your basic bow. It’s surprisingly simple but makes a big impact, making your gifts look extra professional and thoughtful. Think of it as the 'deluxe' version of the loop bow – same ingredients, just arranged in a more impressive way.
The secret to a killer layered bow is creating loops of varying sizes and stacking them strategically. Start with a wider base of larger loops, and then build upwards with progressively smaller ones. This creates a beautiful, cascading effect. Imagine a mini ribbon waterfall adorning your gift! Experiment with different ribbon widths and textures in your layers to really make it pop. For instance, try combining a wide satin ribbon with a narrower sheer ribbon on top for a touch of elegance. It’s all about playing around and seeing what combinations you love.
Layer | Ribbon Width | Loop Size |
|---|---|---|
Base Layer | Wider (e.g., 1.5 inch) | Larger Loops (e.g., 4 inches) |
Middle Layer | Medium (e.g., 1 inch) | Medium Loops (e.g., 3 inches) |
Top Layer | Narrower (e.g., 0.5 inch) | Smaller Loops (e.g., 2 inches) |
Adding Flair: Crafting Rosette Bows
Now, if you're feeling a bit fancy and want to add a touch of floral elegance to your presents, rosette bows are your answer in the realm of diy gift ribbon. These beauties might look intricate, but they’re actually built on a simple folding and swirling technique. Think of them as the origami of the ribbon world – a bit more involved than a basic loop, but incredibly rewarding when you see the final result. Rosette bows are perfect for adding a sophisticated, handcrafted touch, especially for occasions that call for a little extra pizzazz, like weddings or milestone birthdays.
The key to rosette bows is accordion folding your ribbon and then carefully coiling it into a circle. It's like making a paper fan, but with ribbon! The center can be secured with glue or wire, and you can embellish it with beads or buttons for an extra flourish. Don't be intimidated by the folds; once you get the rhythm, it’s almost meditative. Rosette bows are a fantastic way to use up ribbon scraps too, as you can create smaller rosettes with shorter lengths. They are a testament to how simple techniques for DIY gift ribbon mastery can lead to impressive results.
Creative Styles to Elevate Your DIY Gift Ribbon Game
Creative Styles to Elevate Your DIY Gift Ribbon Game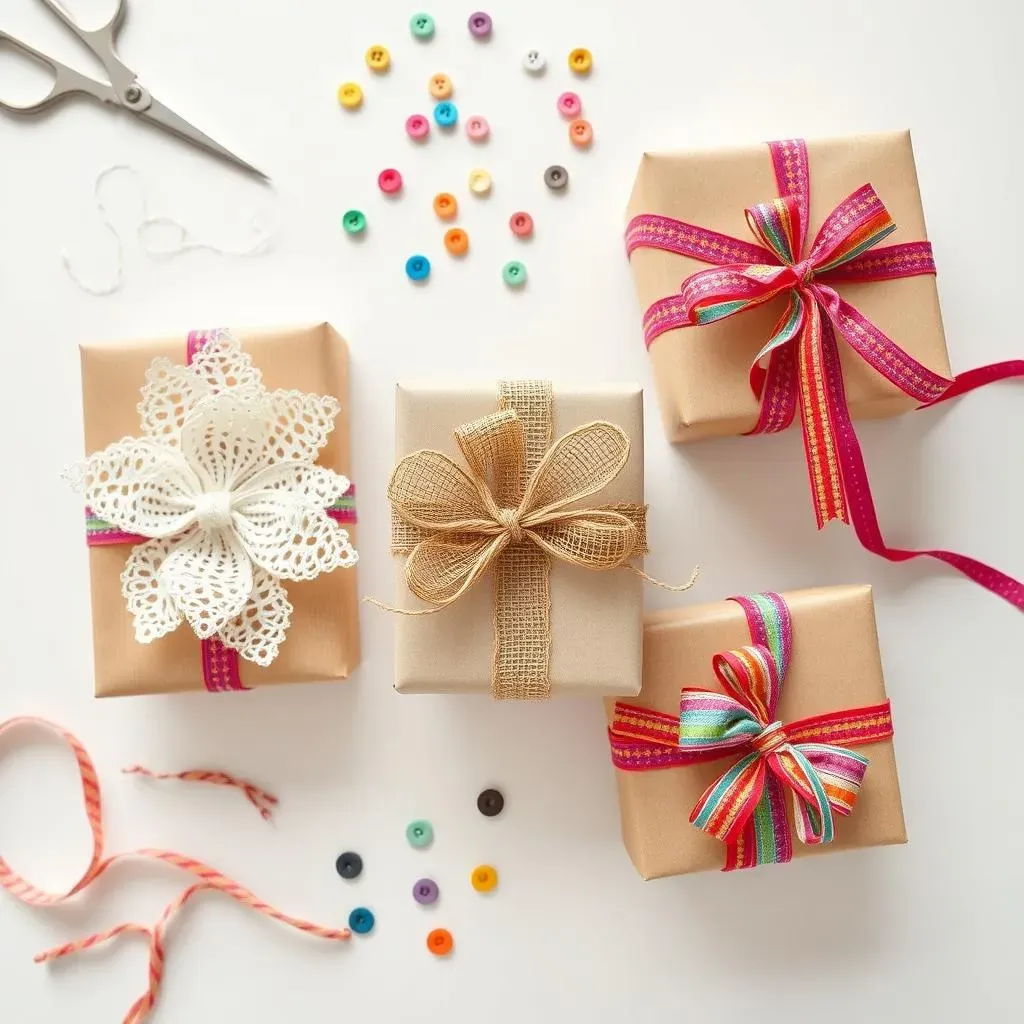
Alright, so you've got the basics down, you're looping and layering like a pro. Now, let's really crank up the creativity and explore some creative styles to elevate your DIY gift ribbon game! Because honestly, who wants a boring bow when you can have a bow that's practically a gift in itself? Think beyond the standard satin and start experimenting with textures, patterns, and even unexpected materials. This is where your personality can really shine through, and you can tailor your bows to perfectly match the recipient or the occasion. Let's get those creative juices flowing and turn ordinary presents into extraordinary ones!
Making Gorgeous DIY Paper Gift Ribbon Bows: StepbyStep
Making Gorgeous DIY Paper Gift Ribbon Bows: StepbyStep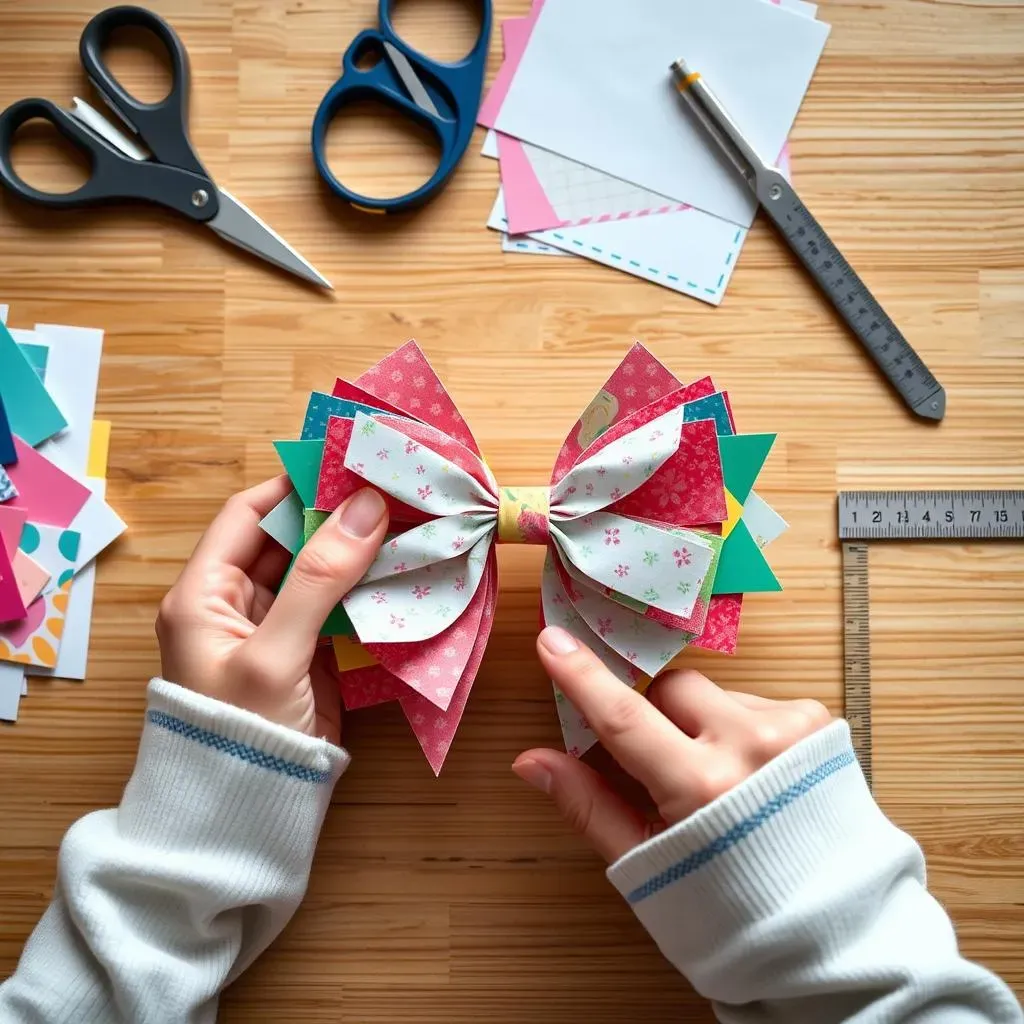
Choosing Your Paper & Essential Tools
let's talk paper! When it comes to making gorgeous DIY paper gift ribbon bows, the paper you pick is key. Think beyond just plain printer paper – although, even that can work in a pinch! Wrapping paper is an obvious choice, especially the double-sided kind for extra flair. Scrapbook paper is fantastic too, offering tons of patterns and textures. Cardstock is your go-to if you want something sturdier that really holds its shape. Seriously, raid your craft stash, you probably have more options than you realize!
Tool-wise, keep it simple. Sharp scissors are a must – nobody wants raggedy edges on their beautiful paper bows. A ruler or paper cutter will help you get clean, straight lines, especially if you're making a bunch. And for sticking things together? Double-sided tape is your best friend for clean, instant adhesion. Glue sticks work too, but can be a bit messier. Hot glue is overkill for paper unless you're really going for a super secure hold, but generally, tape or glue stick will do the trick perfectly for making gorgeous DIY paper gift ribbon bows.
The Simple Fold & Cut Paper Bow Method
Alright, ready to get hands-on and actually start making gorgeous DIY paper gift ribbon bows? Let's start with a super simple fold and cut method. Grab a sheet of your chosen paper and fold it in half, then in half again. Basically, you want to end up with a square or rectangle that's folded into quarters. Now, here's where the magic happens – with your scissors, start cutting shapes into the folded edges. Triangles, curves, zig-zags – go wild! Just make sure you don't cut all the way through the folds, or you'll end up with confetti instead of a bow.
Unfold your paper masterpiece carefully, and voila! You’ll see a cool, symmetrical design emerge. To turn this into a bow, simply pinch it in the center and secure it with a piece of wire, string, or even a small piece of double-sided tape wrapped around the middle. Fluff it out, shape it a bit with your fingers, and boom – instant paper bow! This technique is fantastic for quick, fun bows, especially when you're making gorgeous DIY paper gift ribbon bows with kids – they love the surprise of unfolding their creations.
Tool | Purpose | Why it's useful |
|---|---|---|
Sharp Scissors | Cutting paper | Clean edges, precise cuts |
Ruler/Paper Cutter | Straight lines | Uniformity, professional look |
Double-sided tape | Adhering paper | Clean, instant, no mess |
Level Up Your Paper Bows: Adding Layers & Flair
So, the fold and cut method is cool, but what if you want to really take your paper bows to the next level when making gorgeous DIY paper gift ribbon bows? Layers are your secret weapon! Cut out multiple paper shapes using the fold and cut technique, but make them slightly different sizes. Stack them up, largest at the bottom, smallest at the top, and secure them all together in the center. This adds dimension and makes your paper bow look way more impressive.
Want even more flair? Try adding embellishments! Glitter glue, markers, stamps – the possibilities are endless. Edge your paper shapes with glitter for a sparkly touch, draw patterns on them before cutting, or stamp designs after you've assembled the bow. Get creative with different paper types too – try layering tissue paper for a delicate, airy bow, or use metallic paper for a touch of glam. Seriously, making gorgeous DIY paper gift ribbon bows is all about experimenting and letting your imagination run wild. Don't be afraid to try something new and see what amazing paper creations you can come up with!
Exploring Fabric Options for Unique DIY Gift Ribbon Designs
Exploring Fabric Options for Unique DIY Gift Ribbon Designs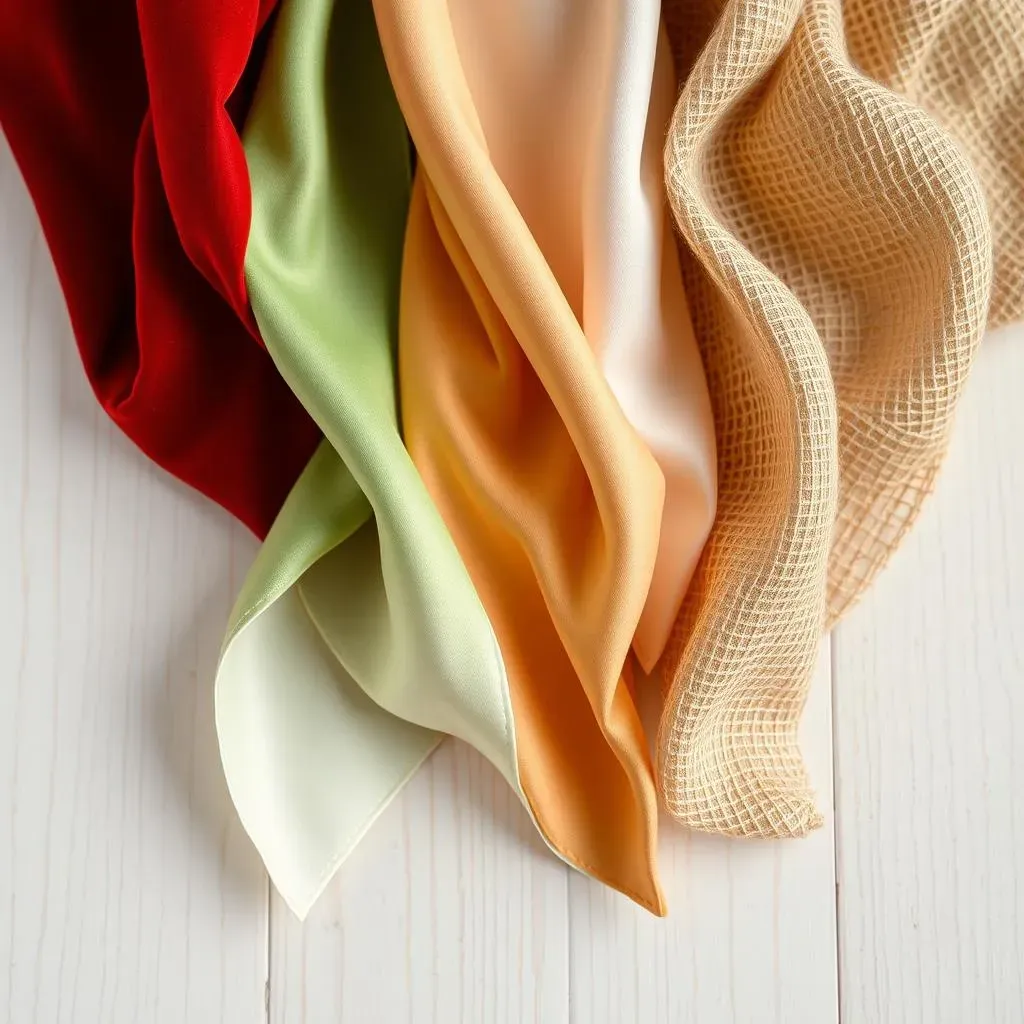
Paper bows are awesome, but let's talk fabric! Exploring fabric options for unique DIY gift ribbon designs opens up a whole new world of texture and sophistication. Seriously, ditch the standard store ribbon aisle and wander into the fabric store – it's like stepping into a bow-making wonderland! Think about it: luxurious velvet for winter holidays, breezy linen for summer birthdays, or rustic burlap for a charming, homespun vibe. Fabric ribbons instantly elevate your gift wrapping from 'nice' to 'wow, did you make that?!' Plus, fabric scraps? Perfect for ribbon projects. It’s eco-friendly and stylish all in one go. Let's dive into some of the best fabrics to use and how to work with them to create truly special DIY gift ribbons.
Luxurious Velvet & Satin Ribbons
For gifts that need a touch of pure luxury, velvet and satin ribbons are your absolute go-to when exploring fabric options for unique DIY gift ribbon designs. Velvet just screams opulence, doesn't it? Its rich texture and deep colors make any gift feel instantly more special. Imagine a deep jewel-toned velvet bow on a Christmas present – talk about festive elegance! Satin, on the other hand, offers a smooth, silky sheen that's perfect for weddings, anniversaries, or any occasion where you want to add a touch of refined glamour. Think soft pastels or classic ivory satin bows – timeless and beautiful.
Working with velvet and satin can be a little trickier than your average ribbon, though. They can be slippery and fray easily. The key is sharp scissors and taking your time. For velvet, cutting on the bias (diagonally across the weave) can help prevent fraying. For satin, using a rotary cutter and mat can give you super clean edges. And when tying your bows, don't pull too tight, especially with satin, as it can wrinkle easily. But trust me, the extra effort is totally worth it when you see the stunning results of exploring fabric options for unique DIY gift ribbon designs with these luxurious materials.
Rustic Charm with Linen & Burlap Ribbons
If your style leans more towards natural and homespun, then linen and burlap ribbons are fantastic choices when exploring fabric options for unique DIY gift ribbon designs. Linen offers a lovely, slightly textured look that's casual yet chic. Think earthy tones and a relaxed, understated elegance. It's perfect for gifts with a natural or eco-friendly theme. Burlap, on the other hand, brings a wonderfully rustic and charming vibe. Its coarse texture adds a touch of country-style warmth. Imagine burlap bows on mason jar gifts or farmhouse-style presents – so cute!
Both linen and burlap are generally easier to work with than velvet or satin. They hold their shape well and don't fray as much. Linen can wrinkle a bit, which actually adds to its charm, but you can iron it lightly if you prefer a smoother look. Burlap can be a bit stiff, so softening it up by washing and drying it before using can be helpful. Experiment with combining linen and burlap for a layered, textured bow. Or try adding lace or twine accents to enhance the rustic feel. Exploring fabric options for unique DIY gift ribbon designs with linen and burlap is all about embracing natural beauty and creating bows with a handcrafted, heartfelt touch.
Fabric | Style | Best Occasions |
|---|---|---|
Velvet | Luxurious, Opulent | Christmas, Formal Events, Special Anniversaries |
Satin | Elegant, Silky | Weddings, Anniversaries, Bridal Showers |
Linen | Natural, Chic | Birthday, Casual Gifts, Eco-Friendly Themes |
Burlap | Rustic, Charming | Farmhouse Style, Mason Jar Gifts, Country Themes |
Essential Tips for Perfect DIY Gift Ribbons Every Time
Essential Tips for Perfect DIY Gift Ribbons Every Time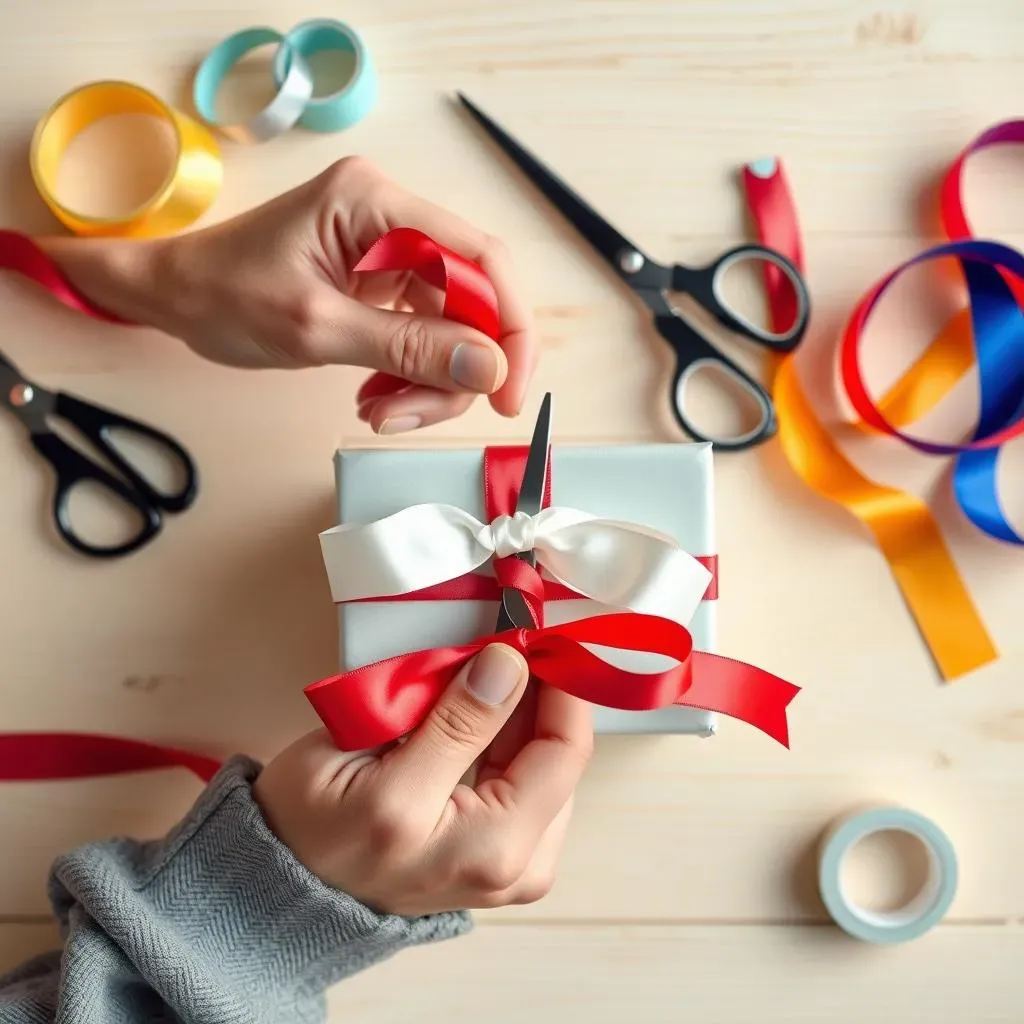
Alright, let's nail down some essential tips for perfect DIY gift ribbons every time, because even with the best techniques, a few pro pointers can make all the difference. Think of these as your secret weapon for bow perfection! We're talking about those little tweaks and tricks that elevate your homemade ribbons from 'cute' to 'flawless'. It’s all about attention to detail and a little bit of know-how. Whether it's choosing the right tools or mastering the finishing touches, these tips will ensure your DIY gift ribbons are always on point, adding that professional-looking pizzazz to every present you wrap.
Choosing the Right Tools & Materials
Seriously, having the right tools and materials is half the battle when aiming for perfect DIY gift ribbons every time. Dull scissors? Flimsy ribbon? Frustration city! Invest in a good pair of sharp scissors – fabric scissors are ideal for ribbon, paper scissors for paper bows. And ribbon choice? Consider wired ribbon your best friend for most bow styles, it just holds shape so much better. For paper bows, cardstock gives structure, wrapping paper offers patterns, scrapbook paper adds texture – the options are endless! And don't forget double-sided tape – it’s a game-changer for clean, seamless bow construction. Trust me, upgrading your toolkit even slightly makes a massive difference in your DIY ribbon success rate.
Think about it like cooking – you wouldn't try to chop veggies with a butter knife, right? Same deal with ribbon crafting! Good tools make the process smoother, more enjoyable, and the results way more impressive. Plus, quality materials just look better. A luxurious satin ribbon will always look more elegant than a cheap, flimsy one. So, before you even start looping and folding, take a moment to gather your supplies and make sure you're set up for success. It's one of those essential tips for perfect DIY gift ribbons every time that’s easy to overlook, but totally worth paying attention to.
Tool/Material | Benefit for DIY Ribbons |
|---|---|
Sharp Scissors | Clean cuts, prevents fraying |
Wired Ribbon | Holds shape, easier to style |
Cardstock Paper | Sturdy paper bows, dimensional |
Double-Sided Tape | Clean adhesion, no mess |
Mastering the Art of the Finish: Neat Edges & Secure Centers
you've made a gorgeous bow, but those frayed ribbon ends and a wobbly center are letting you down? Let's talk finishing touches – because mastering the art of the finish is absolutely one of those essential tips for perfect DIY gift ribbons every time. Neat edges and secure centers are what separate a homemade-looking bow from a handcrafted-chic bow. For ribbon ends, try cutting them at an angle for a polished look, or even better, use a flame (carefully!) to seal synthetic ribbon ends and prevent fraying – just a quick pass, don't set it on fire! For paper bows, clean, straight cuts are key, and consider using decorative edged scissors for extra flair.
And the center? That's the anchor of your bow, it needs to be secure! Whether you're using wire, thread, or glue, make sure it's holding everything tightly together. For layered bows, a strong center is crucial to prevent them from collapsing. Consider adding a decorative element to the center too – a button, a bead, a small charm – it’s a fantastic way to hide your securing method and add an extra touch of personality. Remember, those little details are what people notice, and nailing the finish is one of the most essential tips for perfect DIY gift ribbons every time to truly elevate your gift wrapping game.
Practice Makes Perfect (Seriously!)
Last but definitely not least, let's talk practice. Yes, even for something as seemingly simple as DIY gift ribbons, practice makes perfect. Seriously! Don't expect to become a bow-tying ninja overnight. Your first few attempts might be a bit wonky, and that's totally okay! The key is to keep practicing, experiment with different techniques, and don't be afraid to make mistakes. Grab some scrap ribbon or paper and just play around. Try different loop sizes, different folding methods, different ways of securing the center. Watch a few more tutorials, try to replicate bows you admire, and most importantly, just keep at it.
Think of it like learning any new skill – whether it's playing an instrument or learning to code, repetition and experimentation are key. The more you practice making DIY gift ribbons, the more intuitive it becomes, and the quicker and easier you'll find it. Plus, practice is where you discover your own style and develop your own little tricks and techniques. So, embrace the learning process, have fun with it, and remember that every bow you make, even the not-so-perfect ones, is a step closer to mastering the art of the perfect DIY gift ribbon. And who knows, you might even find it's a surprisingly relaxing and enjoyable way to unwind!
- Use scrap ribbon/paper for practice.
- Experiment with different techniques.
- Don't be afraid to make mistakes – it's part of learning!
- Watch tutorials and try to replicate styles you like.
- Keep practicing consistently to improve.
Wrapping It Up: Your DIY Gift Ribbon Journey
So, there you have it! From basic loops to paper bows and fabric flourishes, crafting your own diy gift ribbon is not only easy but also a fantastic way to personalize your gifts. No more settling for generic bows – now you can create unique, eye-catching toppers that reflect your style and the thoughtfulness behind your present. Grab some ribbon, get creative, and start making those gifts extra special with your amazing diy gift ribbon skills. Happy crafting!