Table of Contents
Tired of the same old, boring store-bought wrapping paper? Want to add a personal touch to your gifts without breaking the bank? Then you've come to the right place! This guide is all about unleashing your inner artist and creating stunning diy gift wrapper that will make your presents stand out. Forget generic patterns and flimsy paper. We're diving deep into the world of creative gift wrapping, showing you how to transform ordinary materials into extraordinary packaging. From mastering simple techniques to discovering affordable supplies, we'll equip you with everything you need to craft unique and memorable wrappers. Get ready to explore a treasure trove of ideas, step-by-step instructions, and inspiration to elevate your gift-giving game with amazing diy gift wrapper. Let's get wrapping!
Unleash Your Creativity with DIY Gift Wrapper Ideas
Unleash Your Creativity with DIY Gift Wrapper Ideas
Think Outside the Box: Everyday Items as Gift Wrap
Seriously, who says gift wrap has to come from a roll? Let's ditch the store-bought paper and raid your house for inspiration. Brown paper bags from groceries? Totally chic and rustic. Old newspapers or magazines? Instantly adds a vintage vibe. Fabric scraps from sewing projects? Hello, reusable luxury! The beauty of diy gift wrapper is that anything goes. It's about seeing potential where others see trash. Think about maps for the travel lover, sheet music for the musician, or even blueprints for the architect in your life. Get creative and let the wrapping tell a story even before they open the gift.
I remember one year, I was totally broke but wanted to give thoughtful Christmas presents. I ended up using old road maps to wrap gifts for my dad, who's a total road trip fanatic. He loved it way more than any fancy paper I could have bought. It was personal, unique, and totally free! Plus, it sparked a conversation about all the places we'd been together. That's the magic of diy gift wrapper – it's not just about covering a present; it's about adding meaning and personality.
From Drab to Fab: Simple Decoration Techniques
so you've got your unconventional wrapping material. Now what? Time to amp up the wow factor with some easy-peasy decoration techniques. Stamps are your best friend here. Potato stamps are ridiculously simple to make – just carve a design into a potato half, dip it in paint, and go wild. Or grab some ready-made rubber stamps for more intricate patterns. Don't underestimate the power of a good marker either. Doodling simple designs, writing personalized messages, or even just adding bold lines and geometric shapes can transform plain paper into a work of art. And for a touch of elegance? Twine and ribbon are your go-to. Wrap them around your package in creative ways, tie on a handmade tag, and boom – instant sophistication. Diy gift wrapper doesn't have to be complicated to be impressive.
Speaking of tags, those are another awesome opportunity to get creative. Forget those generic store-bought tags. Cut out shapes from cardstock, use kraft paper, or even repurpose old holiday cards. Add a personal touch with handwritten names, funny quotes, or little drawings. You can even punch a hole and thread some colorful yarn or baker's twine through for a rustic look. It's all about those little details that make your diy gift wrapper truly special.
Decoration Technique | Materials Needed | Pro Tip |
|---|---|---|
Potato Stamps | Potato, knife, paint, paper | Let the potato dry slightly after carving for crisper lines. |
Marker Doodles | Markers (various colors), paper | Use metallic markers for extra pop. |
Twine & Ribbon | Twine, ribbon, scissors | Experiment with different textures and colors of twine and ribbon. |
Handmade Tags | Cardstock, kraft paper, scissors, pens, hole punch, yarn/twine | Use cookie cutters as templates for tag shapes. |
Nature's Touch: Bringing the Outdoors In
Want to add a natural and organic feel to your diy gift wrapper? Look no further than your backyard or local park. Leaves, twigs, pinecones, dried flowers – nature is bursting with free and beautiful embellishments. Press leaves between book pages to flatten them, then glue them onto your wrapped gifts for a touch of autumnal charm. Tie small twigs or cinnamon sticks to your ribbon for a rustic, woodsy vibe. Dried flowers add a delicate and romantic touch. Even simple sprigs of evergreen can bring a festive and fresh scent to your presents. Don't be afraid to forage and experiment – nature provides endless possibilities for unique and eco-friendly gift wrap decorations.
Last fall, I went on a nature walk specifically to gather materials for gift wrapping. I collected colorful leaves, acorns, and small pinecones. It was such a fun and relaxing way to get into the gift-wrapping spirit. And the best part? My gifts looked absolutely gorgeous and smelled amazing thanks to the pinecones and dried lavender I incorporated. Diy gift wrapper with natural elements is not only beautiful but also a sustainable and thoughtful choice.
Mastering DIY Gift Wrapper Techniques: StepbyStep Guide
Mastering DIY Gift Wrapper Techniques: StepbyStep Guide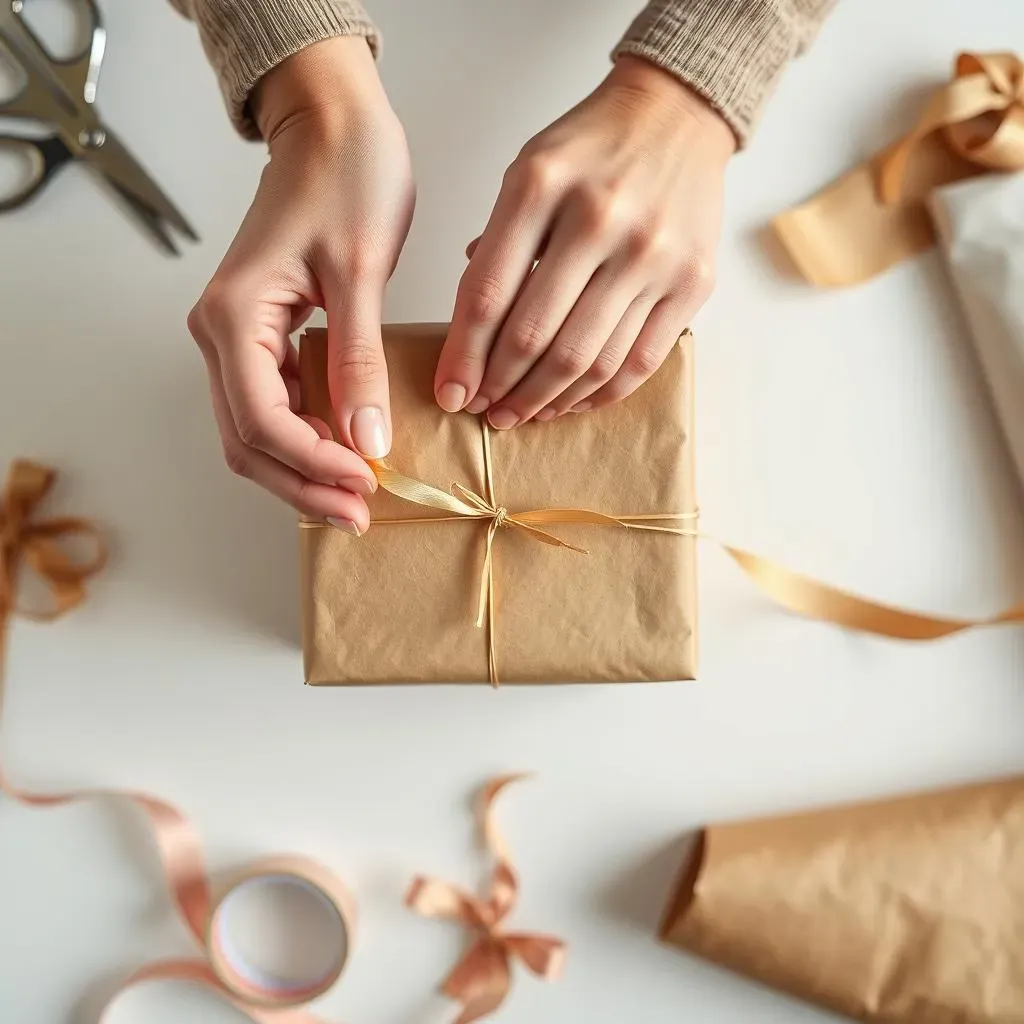
The Foundation Fold: Wrapping Like a Pro
let's talk technique. Even with the coolest materials, sloppy wrapping can ruin the whole effect. But fear not, mastering the basics of gift wrapping is easier than you think. The key is the foundation fold – that crisp, clean fold that makes all the difference. Start by placing your gift face down on your diy gift wrapper paper. Bring one side of the paper up and over the gift, then bring the other side to overlap it, securing it with tape. Seems simple, right? But the trick is to keep the paper taut and crease those folds sharply. Run your finger along each fold to make it extra crisp. This creates those clean lines that elevate your diy gift wrapper from amateur to amazing.
Think of it like origami, but way less complicated. Practice on a box or two before you tackle your actual presents. Don't worry if it's not perfect at first. Like any skill, wrapping gets easier with practice. And trust me, once you nail that foundation fold, you'll be wrapping gifts like a total boss. Suddenly, even simple brown paper looks chic and intentional. It's all about the execution when it comes to diy gift wrapper techniques!
Sealing the Deal: Tapes and Tucks for a Seamless Finish
So, you've got your foundation fold down, awesome! Now let's talk about securing everything without making it look like a sticky tape monster attacked your present. Double-sided tape is your secret weapon for a super clean, professional look. Tuck the tape under the paper folds so it's hidden from view. If you're using regular tape, try to use it sparingly and neatly. Clear tape is less noticeable than colored tape, especially on patterned paper. And here's a pro tip: fold over the edge of your tape before you stick it down. This creates a little tab that makes it way easier to peel off later – no more struggling to unwrap a gift! These little tricks will give your diy gift wrapper that polished, finished feel.
Another key to a seamless finish is tucking in those paper edges neatly. When you're folding the ends of the paper, make sure to create clean triangles and tuck them in snugly. This prevents those floppy, messy-looking ends that can make even the prettiest paper look cheap. Think of it like making hospital corners on a bed, but for your presents. Crisp folds, hidden tape, and neatly tucked edges – these are the hallmarks of masterful diy gift wrapper techniques. Practice these steps, and you'll be amazed at how much better your gifts look!
Affordable Materials for Stunning DIY Gift Wrapper Projects
Affordable Materials for Stunning DIY Gift Wrapper Projects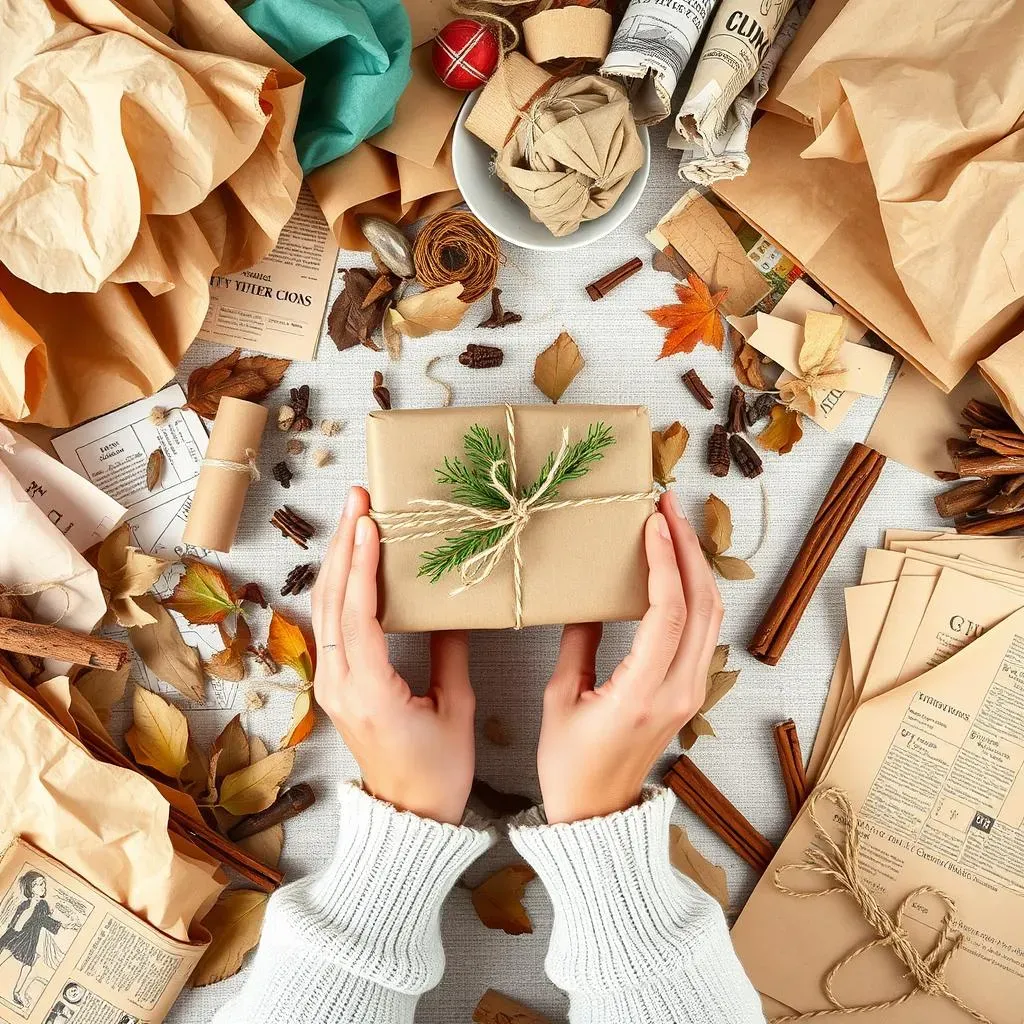
Budget-Friendly Paper Options That Wow
let's talk about keeping it real – and keeping it cheap! You don't need to splurge on fancy paper to create amazing diy gift wrapper. Seriously, some of the best materials are right under your nose, and they won't drain your wallet. Think kraft paper – that brown paper you see everywhere. It's super affordable, comes in rolls or sheets, and is basically a blank canvas for your creativity. Grocery bags, like we mentioned, are another fantastic freebie – just flip them inside out to hide the logos. And don't forget newspaper! Black and white newsprint has a cool, minimalist vibe, and comics pages add a pop of color and fun. The key is to see the potential in these everyday, inexpensive papers. They are the foundation for truly stunning and budget-friendly diy gift wrapper projects.
Beyond paper, think about other materials you might already have. Fabric scraps are awesome for a reusable and luxurious touch. Old scarves, tea towels, even fabric remnants from sewing projects can be repurposed into beautiful furoshiki-style wraps. This is not only affordable but also eco-friendly! For smaller gifts, consider using pretty paper napkins or even doilies. These delicate materials can add a touch of elegance without costing a fortune. The point is, before you head to the craft store and drop a bunch of cash, take a look around your house. You'll be surprised at the treasures you can find to create incredible and affordable diy gift wrapper.
Embellishments That Won't Break the Bank
So, you've got your affordable paper sorted. Now for the fun part – decorations! And guess what? You don't need to buy a ton of fancy ribbons and bows to make your diy gift wrapper pop. Nature, again, is your friend here. Gathering pinecones, leaves, and twigs is totally free and adds a beautiful natural touch. Raid your pantry for spices like cinnamon sticks or star anise – they smell amazing and look super festive tied to a gift. Yarn and twine are also incredibly versatile and budget-friendly. Use them instead of ribbon for a rustic look, or create fun patterns and designs on your paper. Get creative with stamps using potatoes or even wine corks!
Another super affordable embellishment? Good old paint and markers! Acrylic paints, watercolors, evenSharpies can transform plain paper into a masterpiece. Simple polka dots, stripes, hand-drawn patterns, or even just splatters of paint can look incredibly chic and modern. And don't forget about repurposing! Old buttons, beads, even pieces of broken jewelry can be glued onto your diy gift wrapper for unique and sparkly accents. The trick to affordable embellishments is to think outside the box, use what you already have, and embrace simple yet impactful techniques. With a little creativity, you can create truly stunning diy gift wrapper without spending a fortune.
Affordable Material | Where to Find It | DIY Gift Wrapper Use |
|---|---|---|
Kraft Paper | Craft stores, online, sometimes packaging | Versatile base wrap, rustic look |
Grocery Bags (Brown Paper) | Your kitchen after grocery shopping! | Free base wrap, rustic/recycled vibe |
Newspaper/Comics | Recycling bin, free newspapers | Vintage, minimalist, or fun, colorful wrap |
Fabric Scraps | Sewing kit, old clothes, fabric stores (remnants) | Reusable, luxurious wrap, Furoshiki style |
Twine/Yarn | Craft stores, sometimes household supplies | Rustic ribbon alternative, decorative element |
Natural Elements (leaves, pinecones) | Your backyard, parks, nature walks | Free, organic embellishments |
Elevate Your Gifts with Unique DIY Wrapper Designs and Embellishments
Elevate Your Gifts with Unique DIY Wrapper Designs and Embellishments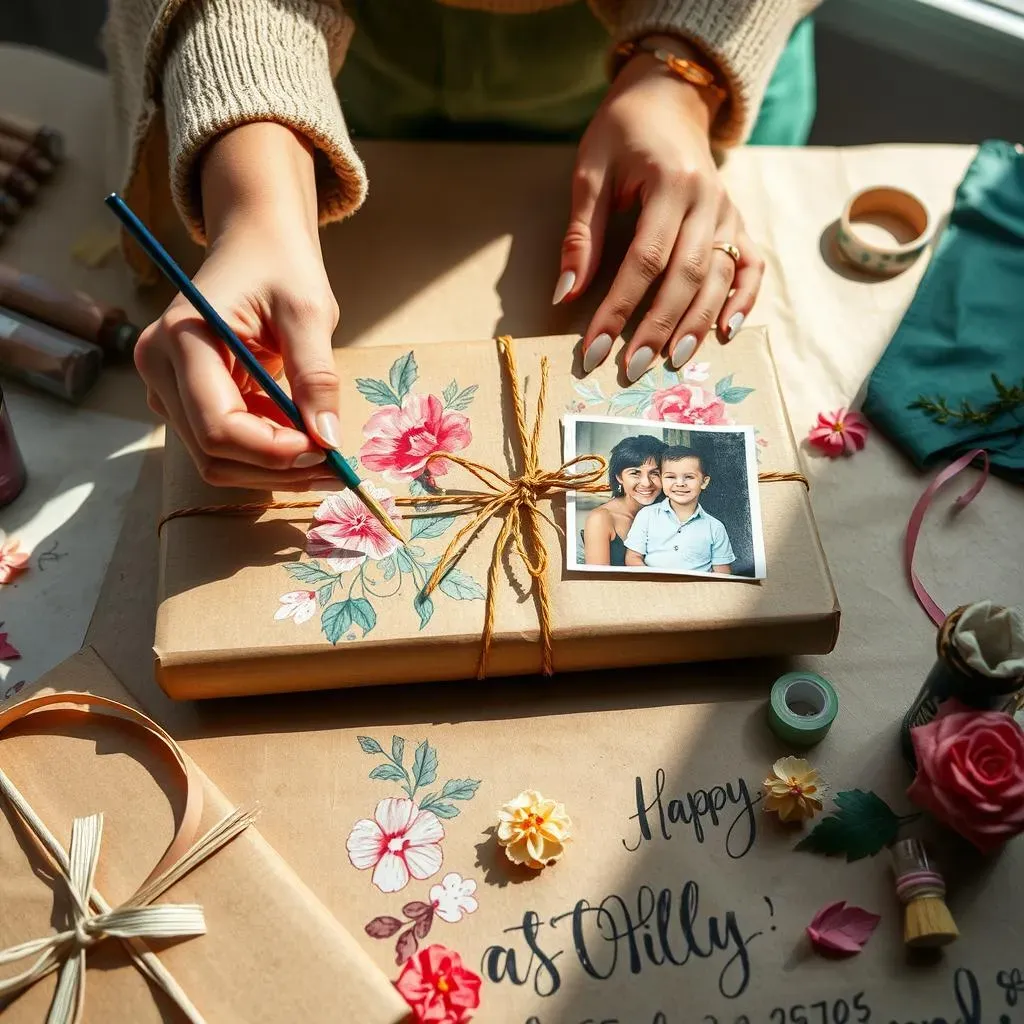
Painted Paper: Your DIY Gift Wrapper Canvas
Ready to seriously elevate your gifts with unique DIY wrapper designs and embellishments? Let's grab some paint and turn plain paper into a masterpiece! Seriously, painting your own wrapping paper is way easier and more impressive than it sounds. Kraft paper is your best friend here – it's cheap, sturdy, and takes paint like a dream. Get yourself some acrylic paints in colors you love, and just go for it. Abstract designs are super forgiving – think splatters, stripes, brushstrokes, or even sponge painting. Geometric patterns are also surprisingly simple to achieve with some painter's tape. Or, if you're feeling ambitious, try your hand at some simple floral or botanical designs. Don't worry about being perfect; the handmade charm is what makes painted diy gift wrapper so special. It's like giving a gift wrapped in art!
I remember one time, I was wrapping a gift for my super artsy friend, and I just felt like plain paper wouldn't cut it. So, I grabbed some watercolors and started experimenting with washes of color and simple leaf patterns on kraft paper. It was so relaxing and therapeutic, and the result was seriously stunning. My friend actually framed the wrapping paper afterwards! That's when I realized the power of painted diy gift wrapper – it's not just wrapping; it's an extension of the gift itself, a little piece of handmade art that shows you really care.
Personalized Touches: Making it Truly One-of-a-Kind
painted paper is awesome, but want to take it to the next level of uniqueness? Personalization is key to truly elevate your gifts with unique DIY wrapper designs and embellishments. Think beyond just names on tags. Consider incorporating elements that reflect the recipient's personality or interests. For the bookworm in your life, decoupage wrapping paper with pages from their favorite novel. For the travel enthusiast, use maps or travel brochures as part of the design. Photos are another fantastic way to personalize – print out some fun snapshots and incorporate them into your wrapping. Hand-drawn portraits, even simple stick figure versions, add a super cute and personal touch. Get creative and think about what makes the person you're gifting to special, and let that guide your diy gift wrapper designs.
For my grandma's birthday one year, I created diy gift wrapper using old family photos printed on kraft paper. It was a trip down memory lane, and she absolutely loved it. It wasn't just about the gift inside; the wrapping itself became a cherished keepsake. That's the beauty of personalized diy gift wrapper – it adds layers of meaning and emotion, transforming a simple present into a heartfelt gesture. It shows you put in extra thought and effort, making the gift even more special and memorable.
- Stenciled Designs: Use stencils for precise patterns or monograms.
- Fabric Flowers & Bows: Add texture and elegance with fabric embellishments.
- Calligraphy or Hand-Lettering: Write names or messages directly on the wrap.
- Washi Tape Accents: Use colorful washi tape for borders, patterns, or to secure edges.
- 3D Paper Cutouts: Create paper snowflakes, stars, or shapes for dimensional details.
Wrap-Up: Your Gifts, Uniquely Wrapped
So, there you have it! You're now armed with a bunch of creative ideas and practical tips to ditch the store-bought rolls and embrace the world of diy gift wrapper. From simple techniques to personalized embellishments, crafting your own gift wrap is not only budget-friendly but also adds a heartfelt touch that mass-produced paper just can't match. Go ahead, raid your craft supplies, get inspired, and start wrapping! Your gifts will not only be thoughtful on the inside, but beautifully unique on the outside too.