Table of Contents
Let's be honest, finding the perfect gift is tough. You want something thoughtful, something that shows you put in effort. And sometimes, the box is just as important as what's inside, right? Standard store-bought boxes can feel a bit... bland. That's where the magic of a diy jewelry gift box cardboard comes in. Imagine presenting a beautiful necklace or a pair of earrings in a box you crafted yourself. It adds a whole layer of personal touch that money can't buy.
Why Bother with a DIY Jewelry Gift Box Cardboard?
Why Bother with a DIY Jewelry Gift Box Cardboard?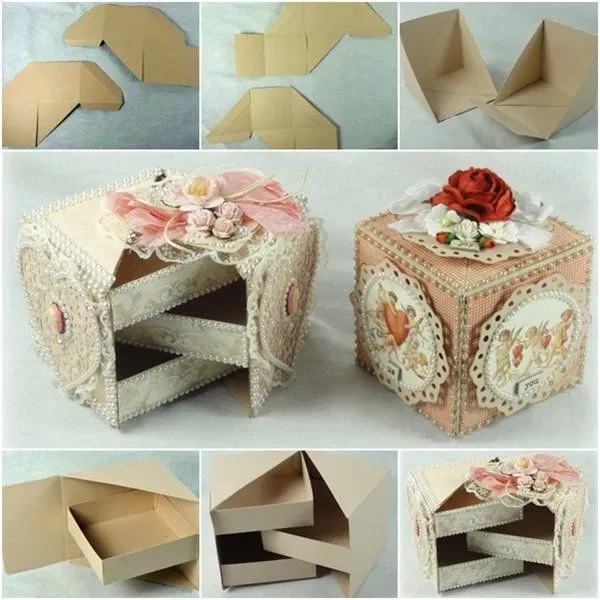
Beyond the Generic: Making it Personal
Look, you could just grab a cheap little box from the dollar store. It's fast, it's easy, and it gets the job done, technically. But does it say "I thought specifically about *you*"? Not really. A store-bought box is just packaging. A diy jewelry gift box cardboard is part of the gift itself. It shows you invested time and effort, not just money. It's like the difference between a generic greeting card and one you actually wrote something meaningful in. One gets tossed, the other gets kept.
Think about it: you're presenting something precious. Doesn't it deserve a vessel that feels equally special? Crafting the box lets you match the style to the recipient or the jewelry inside. Maybe it's rustic for a handmade pendant, or maybe it's bright and bold for a fun pair of earrings. You dictate the vibe, not some factory in who-knows-where.
Practical Perks and Hidden Value
Beyond the warm-and-fuzzy feeling, there are some solid, practical reasons to go the DIY route for a diy jewelry gift box cardboard. First off, cost. Cardboard? You've probably got some in your recycling bin right now. Glue, scissors, maybe some fabric scraps or paint? Odds are, you're already equipped. Compare that to buying multiple gift boxes, especially if you're gifting to several people. The savings add up quickly.
Then there's the environmental angle. Repurposing old boxes keeps them out of the landfill a little longer. It’s a small step, sure, but every little bit helps. Plus, the process itself is a creative outlet. It’s a chance to step away from screens and actually make something tangible with your hands. There’s a quiet satisfaction in taking something destined for the trash and turning it into something useful and beautiful.
- It adds a personal touch that store-bought lacks.
- You can customize the design to fit the gift or person.
- It's significantly cheaper, often using materials you already have.
- It's an eco-friendly way to repurpose materials.
- The crafting process itself can be enjoyable and rewarding.
Gathering Your Cardboard Box Crafting Arsenal
Gathering Your Cardboard Box Crafting Arsenal
The Humble Beginnings: Finding Your Cardboard
Alright, so you're sold on making a diy jewelry gift box cardboard. Great choice. Now, where do you even start? The foundation, literally, is the cardboard itself. You don't need anything fancy here. Those delivery boxes piling up by your door? Perfect. Cereal boxes? Smaller, but usable for tiny compartments or delicate lids. Shoe boxes? Excellent for larger boxes. The key is sturdy, clean cardboard that hasn't been completely crushed or soaked. A slightly thicker corrugated cardboard works best for the main structure, giving your box some real backbone. Thin cardstock from old greeting cards can be useful too, for decorative layers or small details.
Don't overthink this part. Just look around your house before you even think about hitting a craft store. You'd be surprised how much usable material is just waiting for a second life. I once made a surprisingly solid box using just the cardboard from a case of canned tomatoes. It had a nice weight to it. The point is, embrace the recycle bin; it's your initial supply depot for this project.
Essential Tools for Cardboard Transformation
Now that you've got your cardboard stash, you'll need a few basic tools to turn it into a functional diy jewelry gift box cardboard. Safety first: a sharp craft knife or X-acto knife is absolutely essential for clean cuts. Trying to hack through cardboard with dull scissors is an exercise in frustration and probably jagged edges. You'll also need a good ruler, preferably metal, for accurate measurements and as a guide for cutting straight lines. A cutting mat is a lifesaver – it protects your table and gives you a stable surface.
For sticking things together, white craft glue works well for general construction, giving you a little time to adjust pieces. A hot glue gun is fantastic for quick, strong bonds, especially when you need things to stay put instantly. You'll also want scissors for cutting fabric or paper for decoration, a pencil for marking lines, and maybe some binder clips or clothespins to hold things in place while the glue dries. That's really the core kit. Everything else is pretty much optional, depending on how fancy you want to get with the finish.
- Sturdy cardboard (delivery boxes, shoe boxes)
- Sharp craft knife or X-acto knife
- Metal ruler
- Cutting mat (highly recommended)
- White craft glue
- Hot glue gun (optional, but helpful)
- Scissors
- Pencil
Building the Basic DIY Jewelry Box Frame
Building the Basic DIY Jewelry Box Frame
Measure Twice, Cut Once (Unless You Like Wonky Boxes)
Alright, let's get down to brass tacks: cutting cardboard. This is where your trusty ruler and craft knife earn their keep. First, decide on the size of your diy jewelry gift box cardboard. A good starting point is maybe 4x4 inches and about 2-3 inches deep. You'll need a piece for the base and four pieces for the sides. Measure carefully on your chosen cardboard. Use the metal ruler as a guide and press firmly with the craft knife for a clean cut. Don't try to slice all the way through in one go; multiple lighter passes are safer and give you more control. Cut out your base rectangle or square first.
Next, cut your four side pieces. Remember, two sides will need to be the exact length of your base sides, and the other two will need to be the length of the base sides *plus* the thickness of the cardboard you're using for the adjacent sides. If that sounds confusing, just picture how the pieces will fit together – like building a tiny house. The height of all four side pieces should be the same, based on how deep you want your box.
Gluing It All Together Without the Mess
Now that you have your cardboard pieces, it's assembly time for your diy jewelry gift box cardboard frame. This is where you start seeing your box take shape. Apply glue along the edges of the base piece where the sides will attach. Then, carefully position one side piece vertically along that glued edge. Hold it in place. Repeat with the other three sides. You're essentially creating a shallow box structure at this point.
Using binder clips or even heavy books can help hold the sides firmly against the base while the glue dries. White craft glue gives you time to wiggle things into place, which is forgiving if your cuts weren't perfectly square. Hot glue sets fast, which is great for impatience but leaves less room for error. Pick your poison. Ensure the corners meet as cleanly as possible. A little gap isn't the end of the world, especially if you plan to cover it later, but aim for snug joins. Let the glue dry completely before moving on.
- Measure your base piece (length x width).
- Measure your side pieces (length x desired height). Remember to account for cardboard thickness on two sides.
- Use a craft knife and metal ruler for straight, clean cuts.
- Apply glue to the base edges.
- Attach the side pieces one by one.
- Use clips or weights to hold pieces while glue dries.
- Allow ample drying time before handling further.
Making Your DIY Jewelry Gift Box Cardboard Look Amazing
Making Your DIY Jewelry Gift Box Cardboard Look Amazing
From Drab Cardboard to Fab Finish
so you've got the basic structure of your diy jewelry gift box cardboard looking... well, like cardboard. Solid, functional, but probably not winning any beauty contests yet. This is where the fun really begins – turning that humble box into something eye-catching. You've got options here. Painting is the simplest route; acrylic paints work great and come in every color imaginable. Just make sure to use a primer first, especially if your cardboard has printing on it, otherwise, those logos might peek through like unwelcome guests. Another popular choice is covering it with decorative paper, like scrapbook paper or even old maps or book pages for a vintage vibe. Fabric is also a fantastic option; it adds texture and a touch of luxury. Whatever you choose, the goal is to hide the raw cardboard edges and give your box a smooth, finished look. Don't be afraid to mix textures or colors; this is where you inject personality into your creation.
Ideas for Customizing Your Cardboard Gift Box
Ideas for Customizing Your Cardboard Gift Box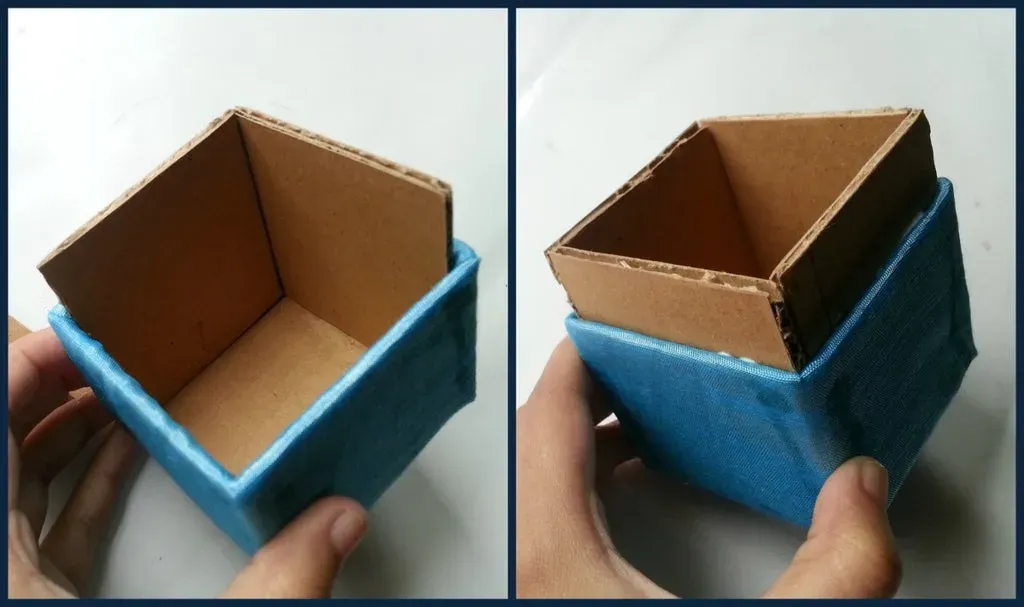
Adding External Flair: Making it Pop
so your diy jewelry gift box cardboard isn't just a naked cardboard frame anymore. It's covered, it's solid, it's looking like a proper box. But does it scream "Wow, this is special!" yet? Probably not. This is where you pile on the personality. Think beyond just paint or paper. Ribbon is your best friend here – a simple satin or grosgrain ribbon tied around the box adds instant elegance. You can glue on beads, sequins, or even small found objects that have meaning to the recipient.
Got any old costume jewelry pieces you don't wear? Break them down and use the bits! A single sparkly earring back can become a charming detail. Stencils are great for adding patterns, or you can try stamping. If you're feeling ambitious, try decoupage with tissue paper or even torn pieces of magazines for a layered effect. The goal is to make the outside so appealing, they almost forget there's something awesome inside. Almost.
Inside Job: Organizing and Protecting Treasures
A beautiful exterior is great, but a truly good diy jewelry gift box cardboard also works on the inside. Nobody wants their necklaces tangled or their earrings rattling around. This is where you add compartments and padding. You can cut thin strips of cardboard and glue them in to create dividers for rings or earrings. Cover these dividers with soft fabric like felt or velvet for a touch of class and to prevent scratching.
For larger items like bracelets or watches, create padded sections. Cut a piece of cardboard to size, wrap it in batting or cotton balls, and then cover that with fabric. Glue these padded pieces into the box. You can also simply line the bottom of the box with a thick piece of foam or batting covered in fabric. It cushions the contents and makes the box feel more substantial and professional. It’s the little details inside that really elevate a DIY project from "cute" to "seriously impressive."
- Consider felt or velvet for lining and dividers.
- Cut cardboard strips for custom compartments.
- Use batting or foam for padded sections.
- Ensure internal materials are acid-free to protect jewelry.
- Think about specific jewelry types (rings, earrings, necklaces) when planning compartments.
Your Custom Box Awaits
So, you've transformed a humble piece of cardboard into something that actually holds value, both sentimental and practical. Stepping away from the generic, mass-produced gift box and opting for a diy jewelry gift box cardboard isn't just about saving a few bucks. It's about imbuing an object with thought and effort. Whether it's housing a cherished piece for yourself or serving as the wrapping for a gift, this little box carries a story. It might not be perfect – maybe the corners aren't razor sharp or the fabric bunches slightly – but that's the point. It's yours, or it's from you. And in a world drowning in identical things, that distinction matters.