Table of Contents
Tired of grabbing those same old boring gift bags from the store? Want to add a personal touch that screams "I actually put thought into this!"? You're in the right place. This guide will walk you through creating your own amazing step by step DIY gift bag. Forget generic and hello gorgeous, handmade goodness! We're diving into a super easy tutorial that even a craft newbie can nail. From picking your perfect paper to those final flourish details, we'll cover it all. Get ready to learn the basic fold, explore cool customization ideas, and snag pro tips to dodge common DIY disasters. Let's ditch the predictable and make some gift bags that are as special as the gifts inside. Ready to get crafty?
MustHave Supplies for Your Step by Step DIY Gift Bag Project
MustHave Supplies for Your Step by Step DIY Gift Bag Project
Alright, so you're ready to dive into making your own step by step DIY gift bag masterpieces? Awesome! Before we even think about folding paper, let's gather our arsenal of must-have supplies. Don't worry, you probably have a lot of this stuff lying around already. Think of it like prepping your kitchen before baking – gotta have the right ingredients to whip up something delicious, right? For killer DIY gift bags, you'll need paper of course, but not just any paper! We're talking wrapping paper (hello leftovers!), cardstock for sturdier bags, scrapbook paper for fun patterns, even brown paper for a rustic vibe. Then you absolutely need scissors or a paper cutter to get those clean lines. Tape is your best friend – double-sided is magic, but regular works too. And finally, a ruler for measuring and scoring folds, plus maybe a pen or pencil to mark things. Seriously, with these basics, you're already set to create some seriously cute step by step DIY gift bags!
- Paper: Wrapping paper, cardstock, scrapbook paper, kraft paper
- Cutting Tools: Scissors or paper cutter
- Adhesive: Tape (double-sided recommended), glue stick
- Measuring & Marking: Ruler, pen or pencil
Easy Step by Step DIY Gift Bag Tutorial: The Basic Fold
Easy Step by Step DIY Gift Bag Tutorial: The Basic Fold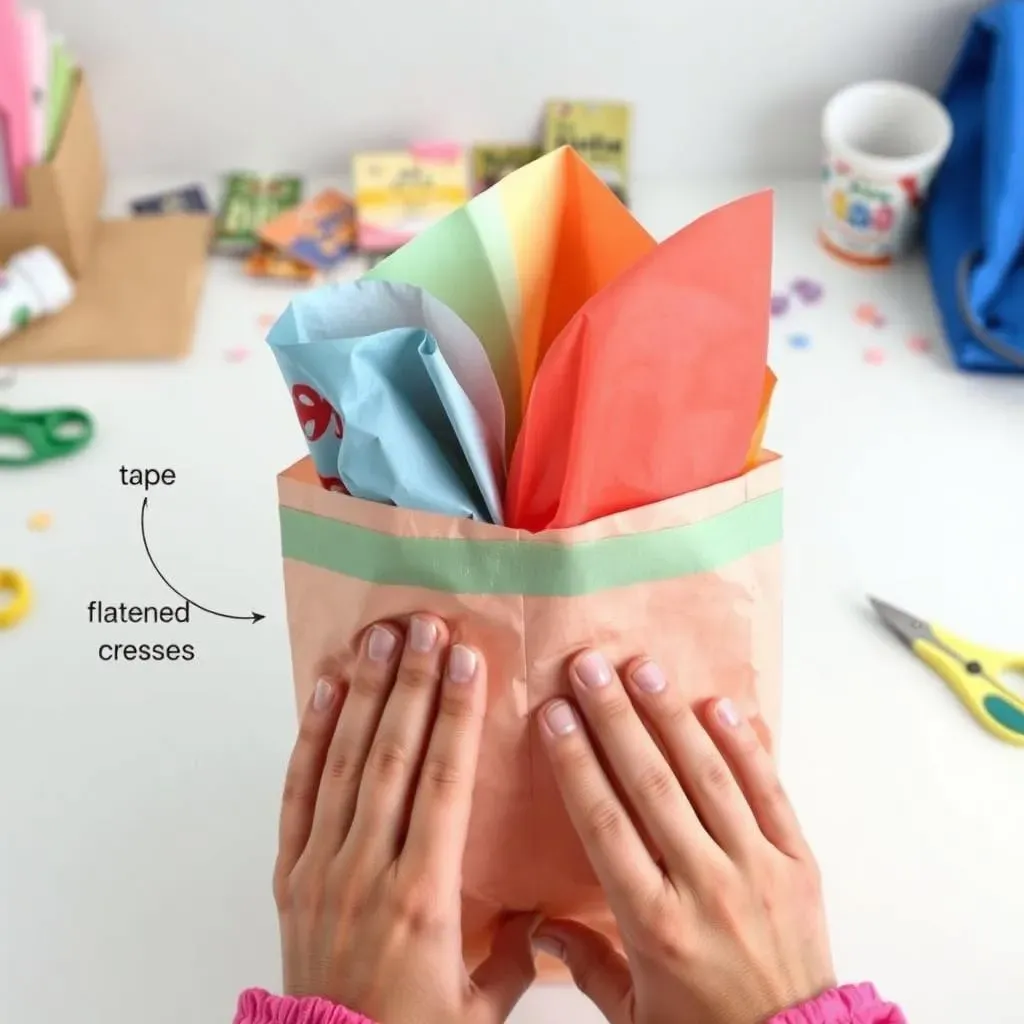
Alright, supply stash ready? Let's get folding and make some magic happen with this easy step by step DIY gift bag tutorial! Seriously, the basic fold is so simple, it’s almost ridiculous. First, grab your chosen paper and lay it face down on your work surface. Imagine you're wrapping a book – you're basically doing a simplified version of that. Fold one long side of the paper over towards the middle, then do the same with the other side, overlapping them slightly. Tape that seam down the center – boom, you've got a tube! Now for the bottom: fold up the bottom edge by a couple of inches (depending on how deep you want your bag). Open up those folded sides you just made, flatten them into diagonal creases, and push the bottom flap up to meet the top edge of that bottom fold. Tape those side triangles down, and reinforce the bottom seam with more tape. And guess what? You just nailed the basic step by step DIY gift bag fold!
Level Up Your Gift Bags: Creative DIY Ideas & Customizations
Level Up Your Gift Bags: Creative DIY Ideas & Customizations
Get Fancy with Embellishments
the basic bag is done, but now's where the real fun begins – let's talk embellishments to seriously level up your step by step DIY gift bag game! Think beyond just plain paper. Ribbons are your secret weapon. Tie them to the handles, create bows, or even weave them around the bag itself for texture. Washi tape is another must-have – it comes in a million patterns and colors, perfect for adding borders, stripes, or geometric designs without any fuss. And don't forget about tags! Handmade tags instantly elevate the look. Use cardstock, kraft paper, or even luggage tags and stamp names, write messages, or add cute little drawings. Seriously, a few simple embellishments can take your DIY gift bag from "meh" to "wow!"
Paper Swaps & Creative Folds
Want to kick your step by step DIY gift bag up another notch? Let’s play with different papers and folds! Who says you're stuck with just wrapping paper? Try using fabric scraps for a soft, reusable bag – imagine a cute little drawstring pouch! Or, for a rustic vibe, brown Kraft paper is your jam. Stamp it with designs, add twine handles, and you've got instant farmhouse chic. Feeling extra crafty? Experiment with origami folds to create unique bag shapes beyond the basic rectangle. There are tons of online tutorials for cool origami gift bag folds – think diamond shapes, starburst tops, even bags that magically unfold into boxes! Don’t be afraid to get adventurous with your paper choices and folding techniques – it’s the quickest way to make your DIY gift bags totally stand out.
Personalize It: Themes & Occasions
The ultimate way to level up your step by step DIY gift bag is to personalize it for the theme or occasion. Birthday coming up? Use bright, festive paper, add confetti or glitter, and tie on a balloon! Holiday gift? Go for themed wrapping paper, add some jingle bells or mini ornaments, and use ribbon in holiday colors. Baby shower? Soft pastel papers, cute baby-themed stickers, and maybe a little pacifier charm. Think about the person and the gift – what colors, patterns, or embellishments would make it extra special for them? Tailoring your DIY gift bag to the occasion shows you put in that extra bit of thought, and that's what makes handmade gifts so awesome. Plus, it’s way more fun than just grabbing a generic bag off the shelf, right?
Theme/Occasion | Paper Ideas | Embellishment Ideas |
|---|---|---|
Birthday | Bright colors, confetti print | Balloons, glitter, fun stickers |
Holiday | Themed wrapping paper (Christmas, Hanukkah, etc.) | Ribbons in holiday colors, jingle bells, ornaments |
Baby Shower | Pastel colors, baby animal prints | Baby-themed stickers, pacifier charms, soft ribbons |
Rustic/Natural | Kraft paper, brown paper | Twine, dried flowers, wooden tags |
Pro Tips for Flawless DIY Gift Bags: Avoid Common Mistakes
Pro Tips for Flawless DIY Gift Bags: Avoid Common Mistakes
Say No to Wonky Lines: Cutting Straight & Scoring Like a Pro
let's talk about those little details that can make or break your step by step DIY gift bag – wonky lines and messy folds! Ever folded a bag and it just looks…off? Yeah, we've all been there. The secret weapon here is learning to cut straight and score your fold lines like a boss. Seriously, a ruler and a paper cutter or even a craft knife are game changers. Instead of just eyeballing it with scissors (tempting, I know!), actually measure and mark your cut lines. And scoring? That's just lightly creasing the paper where you want to fold it. Run a bone folder or even just the back of your scissors along the fold line against a ruler. This creates a crisp, clean fold every single time. Trust me, taking that extra minute to cut straight and score will take your DIY gift bags from "homemade" to "handmade with love and skill!"
Tape Trouble? Adhesive Advice for Strong Bags
Now, let's chat about tape – the unsung hero of step by step DIY gift bags. Because flimsy tape jobs? No thanks! We want bags that can actually hold stuff without bursting at the seams. First pro tip: double-sided tape is your best friend for clean, invisible seams. It hides inside the folds and gives a super professional finish. If you're using regular tape, try to tape on the inside of the bag wherever possible to keep things neat. For heavier gifts or bigger bags, don't be shy about reinforcing those seams! Run a strip of tape along both the inside and outside of the bottom seam, and those side flap closures. And speaking of glue – glue sticks are great for embellishments, but for the main bag construction, tape is generally stronger and faster. Unless you're using liquid glue, and if you do, go easy on it to avoid wrinkling your paper! Strong adhesive = strong, reliable DIY gift bags. Simple as that!
Mistake | Pro Tip |
|---|---|
Wonky, uneven cuts | Use a ruler and paper cutter/craft knife for straight lines |
Messy, creased folds | Score fold lines before folding for crisp edges |
Flimsy tape jobs | Use double-sided tape and reinforce seams, especially for heavier items |
Weak bag bottoms | Reinforce the bottom seam inside and out with tape |
Wrap it Up: Your DIY Gift Bag Journey
So there you have it! You're now officially equipped to ditch the store-bought blah and create your own awesome step by step DIY gift bags. From mastering the basic fold to unleashing your inner artist with customizations, you've got the skills to make gift-giving way more personal and way more fun. Go ahead, raid your paper stash, grab some ribbon, and get crafting. Your friends and family are about to be seriously impressed with your thoughtful, handmade touch. Happy gifting!